react 1 - jsx 和 组件
react
在看本篇之前, 应该有ES6语法基础. 如果没有, 推荐去学习阮一峰的 ES 6 入门.
jsx
react与其他前端 MVVM 框架的最大区别之一应该就在于jsx与html-templete的区别了. 以前的框架都是基于已经存在的html做优化和操作, react却是舍弃了html, 用jsx来替代html的功能, 如果不了解的, 可以把jsx想象成高级版本的javascript代码, 所以比原始的html功能强大得多. 下面介绍jsx.
基本语法
1 | const World = ({ children }) => ( |
上面就是react创建一个组件的代码. jsx即在js代码里面写的类似html构建页面的代码, 语法类似xml, 所以叫jsx. 可以看到, ReactDOM.render函数的第一个参数就是jsx格式的内容, 而World函数的返回值也是一个jsx的内容.
在react里面规定, 如果是大写字母开头的元素, 即作为自定义组件创建, 小写字母开头的元素, 即作为html原始控件创建. 所以World方法首字母必须大写.
那么react到底怎么执行jsx的呢, 这看起来和原始的js以及html区别也太大了点, 下面我们就来看看jsx怎么执行的.
首先, 浏览器是不可能认识jsx的, 那么就有一个叫babel的插件会把jsx编译成js代码, 和我们平常写的代码差不多, 来看看jsx的js版本吧.
1 | ; |
以上代码就是最开始的例子, 由babel编译过后生成的js代码, 浏览器看到的也是这个代码. 从这个代码里我们来分析一下jsx的执行.
首先创建一个World函数, 返回值是React.createElement创建的一个对象, 对象第五个参数又是一个对象, 不过大概根据内容能猜到是<span> World!</span>这行代码. 而我们在jsx里写的{...}这种语法, 都被直接转换成了 js 加入到了参数列表中. 接下来我们看看React.createElement这个函数吧(删掉了一点"development" !== 'production'的代码, 不影响逻辑).
1 | ReactElement.createElement = function (type, config, children) { |
可以看到, 这个函数接收三个参数, type,config,children, type就是span或者我们的World, config是传入的配置信息暂时不用管, children应该就是子节点, 在函数下部分可以看见, 判断如果childrenLength > 1时, 将children拼成数组, 设置到 props 上.
这样看来jsx其实很简单, 如果不想写jsx, 也可以手动调用React.createElement创建组件, 不过一般不需要这么做, 了解原理就好了.
组件声明方式
无状态组件和有状态组件
组件化是react的核心思想, react提供了两种组件声明方式, 上面使用的是函数式声明无状态组件, 还可以使用class extends React.Component方式声明有状态和生命周期的组件. 无状态组件是基于函数式思想, 同样的输入得到同样的输出, 而且react对无状态组件不会产生实例, 无实例化也就不需要分配多余的内存, 从而性能得到一定的提升. 原理上来说就是一直调用函数而已. 有状态组件可以使用react的生命周期函数, 实现一些高级功能.
1 | class World extends React.Component { |
由编译后的代码可以看见, 在jsx的转换这块, 并没有什么区别.
组件的生命周期
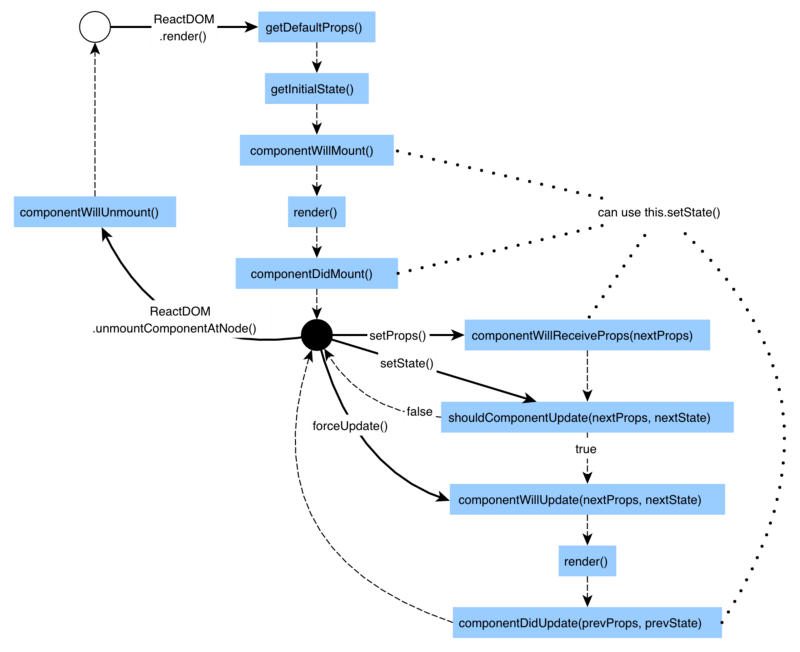
react有状态组件是有生命周期的, 从初始化到加载到销毁, 都可以设置相关函数. 下面来看看生命周期函数.
getDefaultProps[=>static defaultProps]getInitialState[=>constructor(props, context)]componentWillMountrendercomponentDidMountcomponentWillReceiveProps(nextProps)shouldComponentUpdate(nextProps, nextState)componentWillUpdate(nextProps, nextState)componentDidUpdate(prevProps, prevState)componentWillUnmount
除开getDefaultProps和getInitialState, react组件一共有 8 个生命周期函数可以使用. getDefaultProps和getInitialState是使用React.createClass()方式时的初始化方法, 在ES6``class类型的组件里面, 已经由static defaultProps和constructor(props, context)替代.
这些函数的执行顺序依次是从上到下, 而且在componentWillUpdate和componentDidUpdate中间还会触发一次render函数. 网上有一张比较好的图说明它们的关系.

两种功能组件
组件从功能性来说, 可以分为两种功能: 做页面展示和做逻辑交互. 所以我们写组件一般分成两种类型: 展示组件和容器组件.
展示组件
- 展示组件只做纯页面展示
- 可以包含子级的展示组件, 一般含有自定义样式
- 可以使用
this.props.children来包含其他组件 - 一般不依赖其他组件和数据, 所有的数据都是由父级传入
- 可以有自己的状态变量, 不过一般都是为展示
UI使用的变量 - 大多数都可以写成函数式组件, 除非有自己的状态变量
- 如果有自己的事件触发, 那么都会有相应的事件响应函数, 响应函数通常由父级传入.
- 展示组件所在文件夹为
component
容器组件
- 容器组件一般包含很多个展示组件, 也可以有其他容器组件
- 容器组件一般很少有自定义样式, 基本都是用作包裹的
div标签 - 容器组件负责从后台获取数据, 并交给展示组件负责展示
- 容器组件可以从展示组件的事件触发回调函数中获取数据并与后台交互
- 维持许多状态变量, 通常作为数据源
- 一般使用高阶组件生成(
Redux.connect) - 容器组件一般有自己的
action和reducer - 容器组件所在文件夹为
container
react 1 - jsx 和 组件

